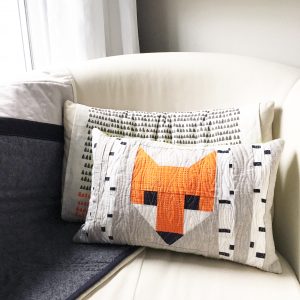
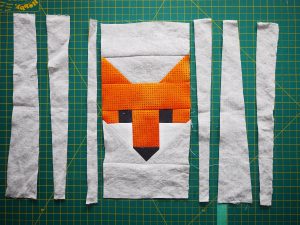
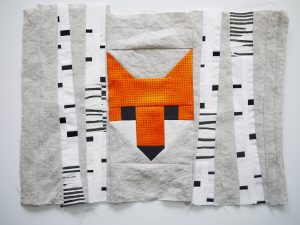
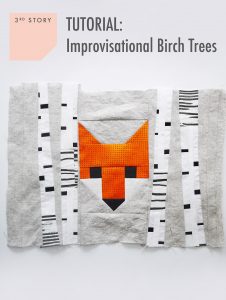
 If you’ve been following my blog, you will know that I prefer to test new ideas and techniques on small projects such as mini quilts, pillows, and trivets. The project below is a 12” x 18” pillow cover featuring Elizabeth Hartman’s Fancy Fox.
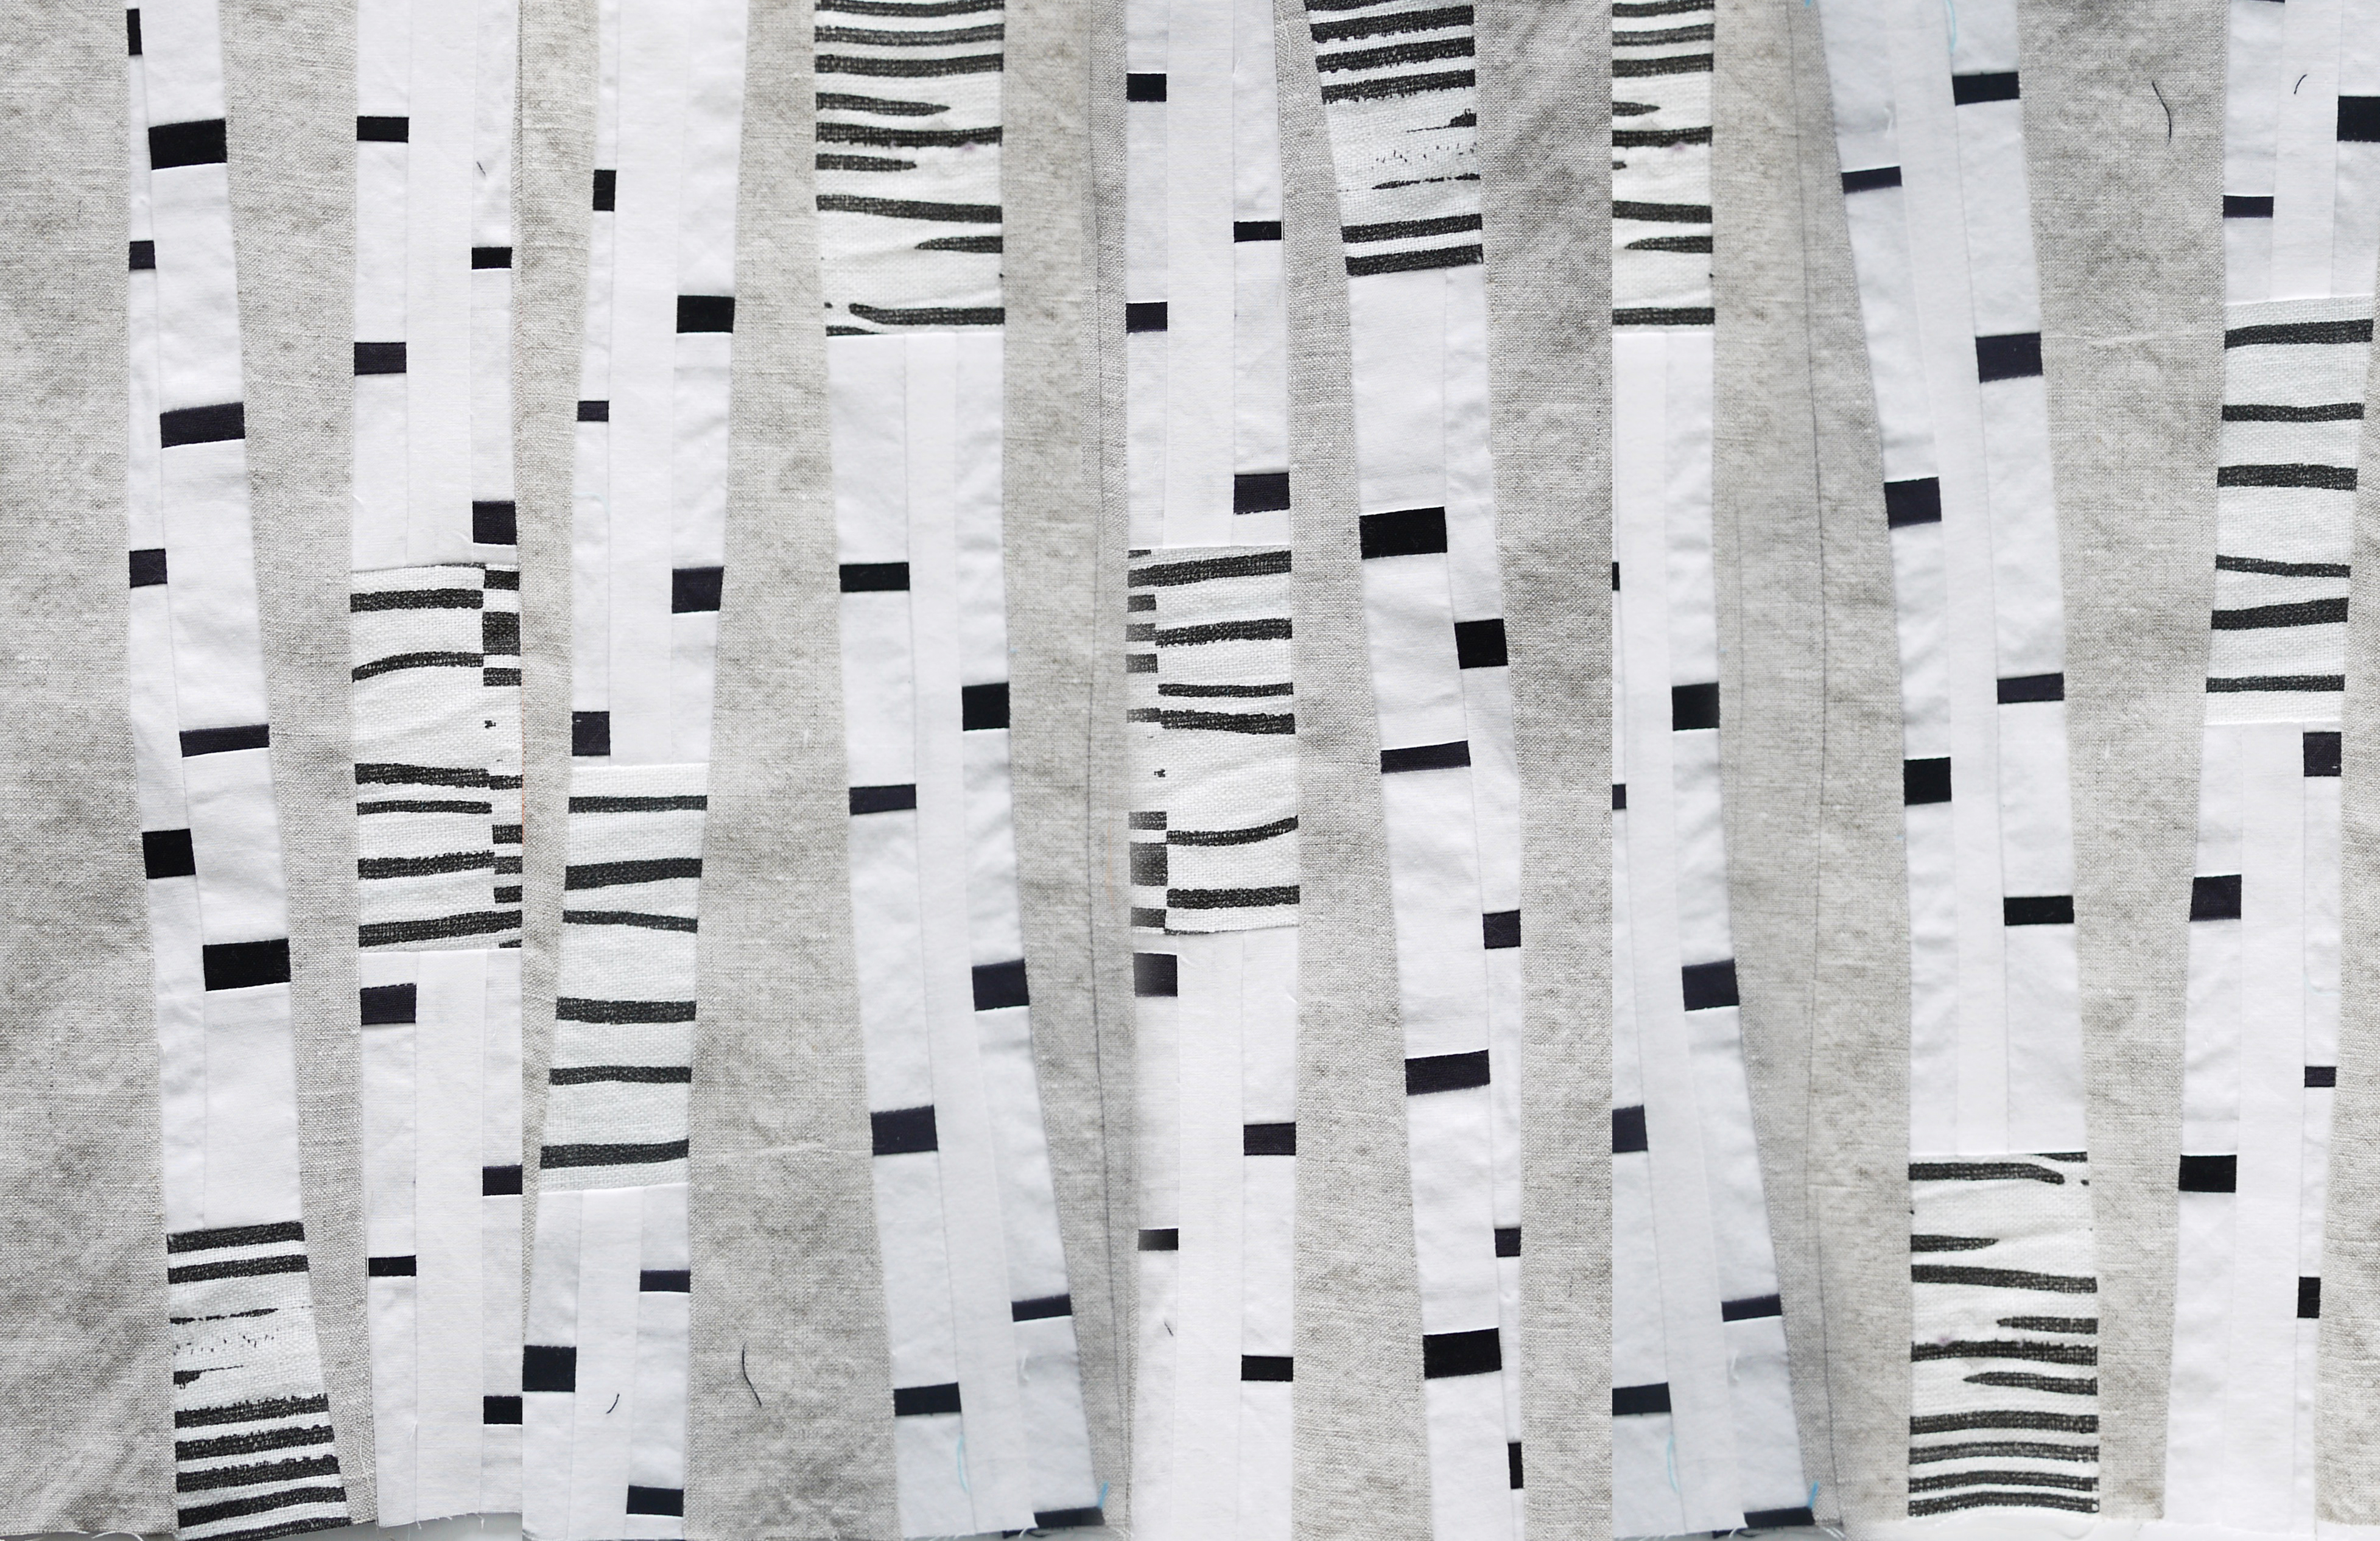
This is a somewhat improvisational technique, so that means that variation adds interest. All measurements are given as guidelines; allow yourself to approximate. No cuts have to be straight, no widths have the same, no lines have to be parallel. More variation results in a more realistic birch forest.
If you’ve been following my blog, you will know that I prefer to test new ideas and techniques on small projects such as mini quilts, pillows, and trivets. The project below is a 12” x 18” pillow cover featuring Elizabeth Hartman’s Fancy Fox.
This is a somewhat improvisational technique, so that means that variation adds interest. All measurements are given as guidelines; allow yourself to approximate. No cuts have to be straight, no widths have the same, no lines have to be parallel. More variation results in a more realistic birch forest.
3rd Story Workshop’s Improv Birch Trees
Yields at least 4 trees, roughly 1.5” x 15”, finished
with leftovers for future birch tree projects.
A 1/4” seam is assumed, unless otherwise noted.
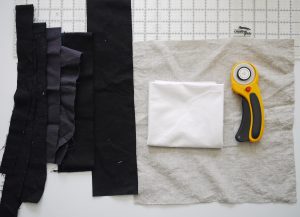
Fabric Requirements:
1 white or off-white fat quarter
4 scrap strips of black and or dark grey, ranging from 1” to 2” wide x ~18” long
Scraps of white, off-white, or black/white stripes, about 1.5” x 3.5” (stripes should be parallel to the 1.5” edge)
Background fabric, width of your project x ~14” tall
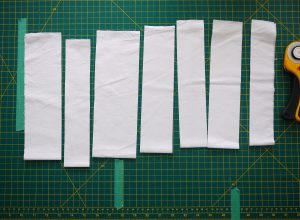
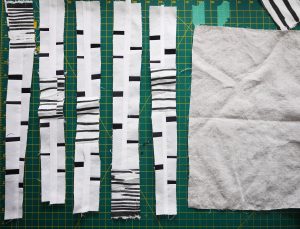
- Fold your fat quarter in half along the 22” edge. (This step is not necessary, it’s just easier to cut and is what is pictured below.)
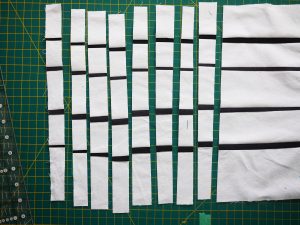
- Cut into strips between 2” and 3” wide. The strips don’t have to be very straight or parallel.
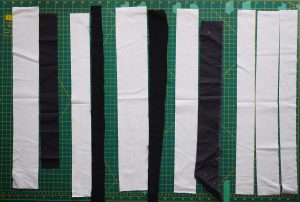
- Put your three skinniest strips aside.
- Pair 4 white strips with your black strips. Piece them together.
- Cut off any excess black.
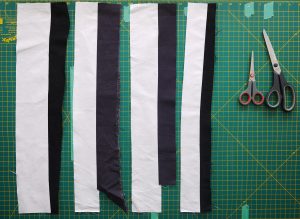
- Slice off a bit of the black strips, leaving about 1/2” attached to the white. (Remember: Variation is best! More or less than 1/2” is good. Not quite parallel is good.)
- Piece your strips together.
- Add one additional white strip from the strips you put aside in Step 3. Voilà, a panel of fat white stripes and skinny black stripes.
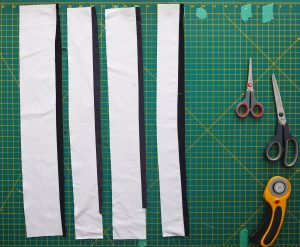
- Cut 8 strips off your pieced panel, roughly 1.5: wide.
- Pair them up and turn one strip from each pair upside down.
- Take your remaining two white strips and cut them in half lengthwise.
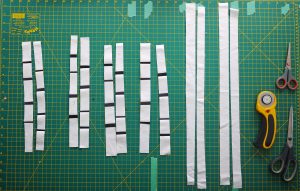
- Insert them in between your stripy strips.
- Join each trio together with a rough 1/4” seam.
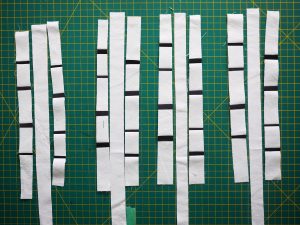
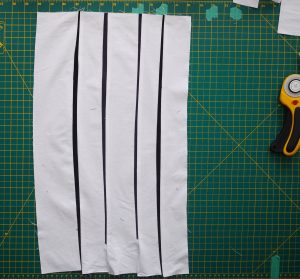
- You can make skinnier trees by omitting the white strip in the middle. My fifth tree, on the right below, shows you how this will look. (Another variation = good!)

- The resulting trees are about 12.5” tall, but I needed a little more height for my pillow. I sliced three trees into two; the cut line varies in position.
- This is where you will add the additional white, off-white or striped scraps. I used some hand-printed linen scraps from Keephouse that I picked up last weekend. For the two trees on the right, I added the extra fabric to the bottom of the tree.
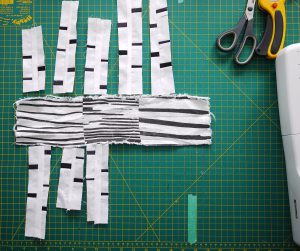
- Trim the addition to match the width of the tree.
- Take your background fabric and slash them at various angles. For my project, the Fancy Fox is part of my “background” and is centred between two pairs of trees.
- Lay your birch trees in the slashes, and piece your verticals together in pairs, leaving a extra bit of length of tree at the top and bottom.
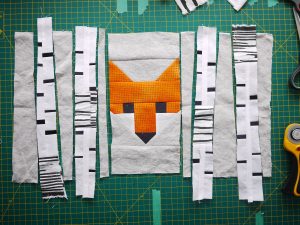
- Trim the extending tree bits off the top and bottom to line them up with your background. This will help you align the next background piece without having to deal with funny angles.
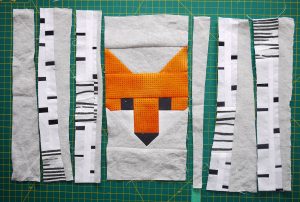
- Finish piecing the remaining verticals.
- Baste, quilt, finish as desired.
Variations for your forest:
- For taller trees, stack and join the trees or add more scraps as per Step 15 and 16.
- For some skinnier and different looking trees, omit middle white strip as per Step 14.
- For quicker trees, only use a single ~2” strip from your pieced panel, as per Step 9. No additional piecing before you insert the tree into your background.
 You’ll see in this photo that I had to add more background fabric to the left and right to make it wide enough for my pillow. These seams will almost disappear when quilted, especially because it’s linen. I can’t see Elizabeth Hartman’s Fancy Forest with anything other than free motion quilted wood grain, so that’s how this one will be quilted. I found instructions for wood grain FMQ in Free Motion Quilting with Angela Walters. Check out more birch trees on this Pinterest board.
Thanks for making this awesome tutorial, Andrea. You are soooo creative. Think I will try making one for Niki.
Can’t wait to see what you come up with, Linda!
Really clear and helped me feel comfortable creating birch trees for my quilt. The step by step photo and descriptions simplify the creative process and make the birch tree illusion manageable
Thank you
Glad it was useful for you, Donna!
Thanak you so much for this wonderfully detailed tutorial. It is just what I need. I do love all the birch tree patchwork I have seen but this one is just perfect for me. I am happy to have found you and thanks again for sharing. Wishing you all the best from Germany.
Glad you’be found the tutorial useful! Improv piecing is especially rewarding when you have guidelines to make the final product cohesive!
I tried this birch tree and really had fun playing with the different fabrics from my stash. My piecing went together somewhat different than you show, but it turned out quite nice. Thanks for this tutorial. Would attach a photo, but don’t see how to do it.
Katrine
Oh, I’m so glad you tried it! You can send a photo to hello@3rdstoryworkshop.com. I’d love to see it!
Hi really like your pattern would like to make myself do you sell pattern individually?
Could you let me know price and if you can email to me?
Tracygrint@hotmail.com
Thanks for your interest! I’ll send you an email.
Would this tutorial work the same for a larger quilt?
Yes, Chendra, it should! I used this same method for a quilt and stacked my strip sets to make them taller. You can also cut them wider to make the appearance of larger trees. Check out the result here: https://3rdstoryworkshop.com/sleepy-fox-quilt-thoughts-on-the-client-relationship
I used this technique to make a blue bamboo forest. I did your technique up to step 9, then slashed a coordinating blue and green leafy batik fabric. To finish I used Heat ‘n Bond to iron on some bamboo leaf clusters (raw-edge applique, with a bit of machine stitching to add detail and anchor it to the base). I had that idea for at least a year and your tutorial finally showed me the way to do it. The only tip I can add is to account for final trimming by ensuring lots of extra “height” in the matrix/background fabric.
Next I am planning a more conventional birch forest on a relaxing blue and grey background. Using an improv technique is so freeing!
Amazing, Violet! 🙂
Thank you for the info. My first grand baby is due in a month and a half. My daughter wants a woodlands nursery, and this is exactly what I needed as per her request for Keegan’s first quilt. I’m off to make birch trees.
Perfect!! 🙂
Hi Andrea!
You are a lifesaver!! I’ve been looking for birch tree fabric for a maple leaf quilt background for years! I never even thought of making it from scratch! You did a very good job explains how to do it. I hope you’re teaching- if not, you should be !! Thanks a bunch!
Carla
So glad it was helpful!!
Great tutorial! Thx for sharing!
What size was your finished quilt? I have a running fox applique that is 14 x 20. Trying to figure out proportion to make birch trees?
Hi Deborah, The finished quilt was about 45″ x 60″. This original fox was about 20″ wide, so using the birch tree tutorial as is should work for you.